One of the main components of a floor system is the I-joist. Wesbeam floor systems utilise our premier I-joist product, e-joists to provide strength and stability while using less material than traditional solid wood joists.
When using a high-performance i-joist, they must be installed correctly to ensure the structural integrity of the floor system. Installation errors can lead to several problems down the line, from squeaky floors to retrofitting. Here are some common i-joist installation mistakes to avoid and how to prevent them.
Not Accounting for Load
Accounting for floor loads is usually done in the floor system design stage. All the materials and loads have been accounted for before the joists arrive on site for installation. The installation stage gives builders and engineers the final chance to ensure that all loads have been suitably allowed for. Track all the loads starting from the roof down to the foundation. Don’t forget to account for any additional loads that are installed after the structural frame is built. This includes benchtops, furniture and appliances.
Using Incorrect Blocking
Blocking is commonly used to support the joists in a floor frame. Blocking panels provide lateral restraint to the joists and transfer vertical loads from the structure into the support walls below. Either rimboard or joist blocks can be used as blocking. If blocking isn’t installed or is installed incorrectly, it can cause the joists to roll over while the sheet floor is being installed.
Temporary battens must be also installed during the construction process. This allows you to walk on open joists and lay flooring during construction.
Incorrect Hole Cutting
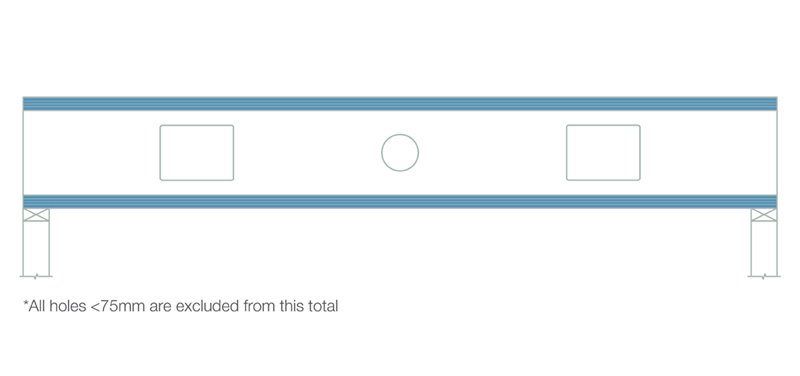
Holes often need to be cut in the joist web for the installation of wiring, pipes or air conditioning ducts. If the hole is cut too large, too closely spaced to adjacent holes, or too close to flanges it can weaken the performance of the joist. Best practice is to determine the hole locations during the design phase. If this isn’t possible, installers should comply with the rules set out in Wesbeam’s services hole guide.
The most important thing to remember for cutting holes in I-joists is to avoid cutting into the flanges. The LVL flanges along the top and bottom of the joists act like tension and compression members in a truss. They cannot be cut without affecting the structural integrity of the joist. The structural web within 5mm of the joist flanges should also be avoided.
Always mark out where the holes will be cut on the joists before cutting. It’s recommended that you use a timber hole saw for circular holes. When making rectangular holes in the web, make sure not to over cut square edges on holes. Adding drill holes to each corner of a rectangular hole will help prevent this.
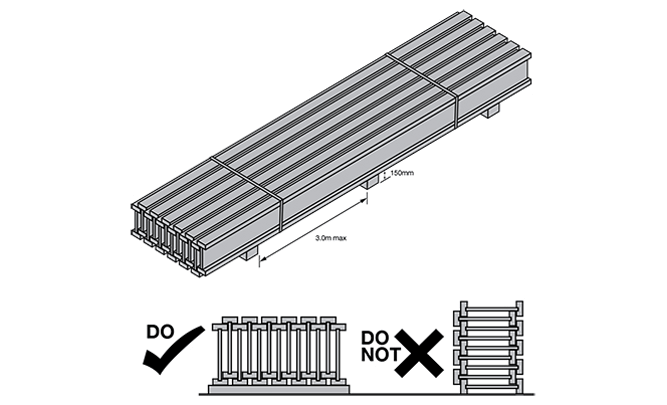
Improper Storage of Joists
Joists must be stored and handled correctly to avoid any damage. Ensure that the Joists are stored in a flat dry area and kept clear of moisture when received on site. Storing joists uncovered or on the ground makes them susceptible to ponding or moisture. Wesbeam e-joists must also be stacked upright to prevent any damage during storage or handling.
Not Performing a Final Check
It’s essential to do a final inspection of a floor system after installation. Check that any nails that may have skewed beside a joist/beam or bracket are removed or given clearance to reduce any chance of creating a floor squeak. The nail check will likely stop any nails that have been missed or skewed beside a joist or bearer creating squeaks in the floor.
Refer to the e-joist Installation Guide for more information on the correct installation of e-joists or use our tech hotline to speak to a member of our design team.